A Git Setup
To participate in the git lesson, you need to:
- Download and install
- R
- RStudio Desktop
- git:
- Windows - to install see section A.1 below.
- OS X ≥ 10.9
- OS X ≤ 10.8 snow-leopard
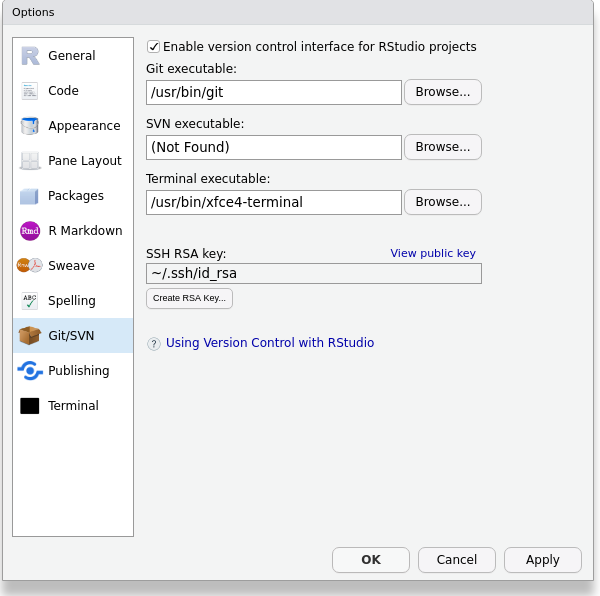
- The location of the Git executable in RStudio is set in
Tools > Global Options… > Git/SVN
as shown in the screenshot below.
The default location of /usr/bin/git won’t work for most people, so
set the location of Git executable as follows:
- Windows = C:/Program Files/Git/bin/git.exe
- OS X = /usr/local/bin/git
- Setup your SSH RSA key if necessary in RStudio - if your SSH RSA key is (none) instead of ~/.ssh/id_rsa or similar, then click on the button to Create RSA key…
- Have a github.com account, and
- Copy your SSH RSA key to github.com - in the RStudio window below click on View public key and copy the public key to your account as explained in step 2 onwards: https://help.github.com/en/articles/adding-a-new-ssh-key-to-your-github-account Make sure to test your GitHub connection by opening a shell in RStudio using Tools > Terminal > New Terminal and run the command to test your account as described in https://help.github.com/en/articles/testing-your-ssh-connection otherwise you may run into trouble with RStudio prompt window overflowing with the authenticity prompt.
- Install the
tidyverseandmodelrpackages in RStudio.
A.1 Git for Windows installer
These instructions1 are for Windows only:
- Click on Next four times (two times if you’ve previously installed Git). You don’t need to change anything in the Information, location, components, and start menu screens.
- Select Use the nano editor by default and click on Next.
- Keep Git from the command line and also from 3rd-party software selected and click on Next.
- Click on Next.
- Select Use the native Windows Secure Channel library, and click Next.
- Keep Checkout Windows-style, commit Unix-style line endings selected and click on Next.
- Select Use Windows’ default console window and click on Next.
- Leave all three items selected, and click on Next.
- Do not select the experimental option. Click Install.
- Click on Finish.
These Git Windows installer steps are from the Software Carpentry setup page.↩